
Adding a promotional banner rail to a layout
A promotional banner rail is a rail or rail section that contains an image that the user can click or tap to perform an action (for example, go to a particular content, channel, deep link, or URL).
You can specify a different target for each hardware platform to take account of the fact that different platforms use different formats for such links.
To add a promotional banner to an existing layout, in Rails Builder:
1. Add the rail/section
To add the rail/section:
Click on the template that contains the layout in the left pane.
Click on the layout that you want to add the promotional banner rail to.
Note: you can also add a promotional banner rails section to a rail that includes other types of sections (for example, content sections or recommendation sections).Add a new rail:
If the layout is empty, click Create Rail.
If the layout already contains rails, click Add New Rail in the right pane.
Click
 and select the locale for the rail.
 Give your rail a name and a title and click Create Rail >.
2. Add content to the rail
To add the promotional banner content to the rail:
In the newly-created rail, click Add Content.
For each rail section that you want to add (do this only once if you want the rail to consist of a single section):
At the top, hover over Custom and then click Key Value Pair Section.
Click
and select the locale for the rail/section. Optionally, in Name, type a name for the section.
In Number of items, enter a number. The promotional banner will be displayed at the width of this number of regular rail items.
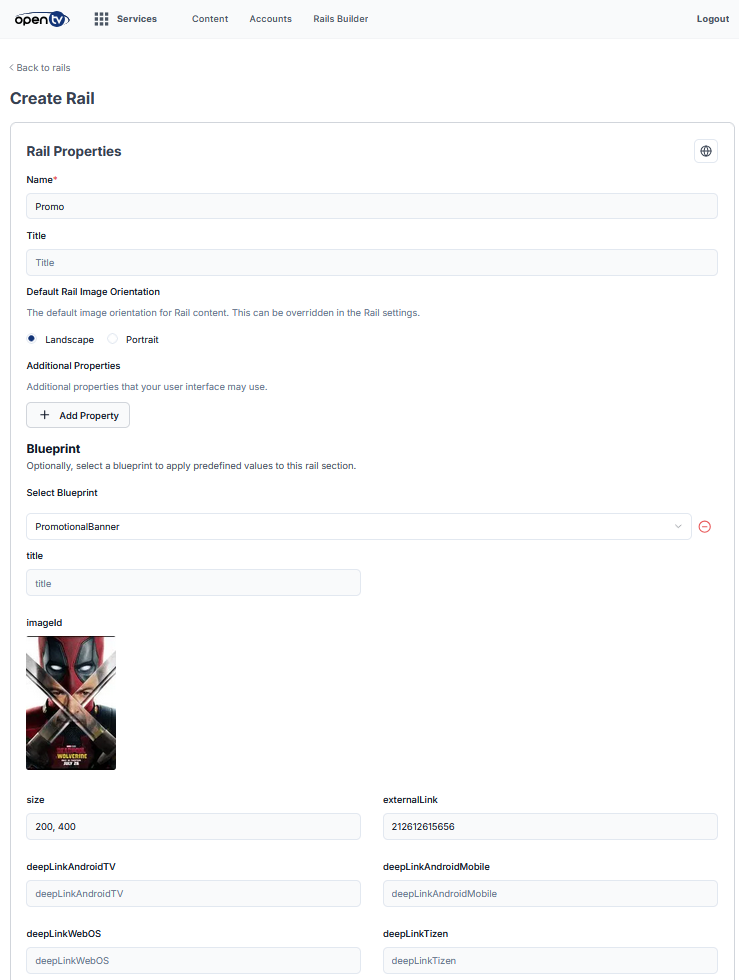
For example, to make the banner image ten times as wide as a regular rail item, enter 10 here.Under Blueprint, select PromotionalBanner from the drop-down.
Optionally, in Title, type a title for the banner.
Under imageId, click the image to select an image. Either:
Select an existing image.
Click Upload Image, then click or drag to select an image to upload, then click Upload.
Click Select.
Fill in the remaining fields as follows. Note that all of these are optional (for example, if you do not have an app for a particular platform, you do not need to define a link for that platform).
In Size, type the size for the image. This is passed to the client as-is, so the format must be agreed with the client app integrator.
Either:
Specify one of the following in externalLink:
A regular web URI – if the user clicks on the banner, the client app will either open the link in a web view or in a browser.
The ID of a content, a channel, or an event – if the user clicks on the banner, the client app will typically navigate to the appropriate media card.
Specify the deep links for the platforms you support in the following fields:
deepLinkAndroidTV
deepLinkAndroidMobile
deepLinkWebOS
deepLinkTizen
deepLinkWeb
deepLinkOther
In campaignCode, type a campaign identifier. You can use this to track the performance of the promotion in TV Analytics.
In localizedPromotionalText, type the localised promotional text to be used for the banner. This must be valid JSON in the format:
JSON[{"<locale>":"<text>"}, ...]For example:
JSON[ {"en": "Hello World"}, {"es": "Hola Mundo"}, {"fr": "Bonjour le monde"}, {"de": "Hallo Welt"}, {"it": "Ciao Mondo"}, {"pt": "Olá Mundo"}]In uiLayout, specify the layout that the client should use to display the banner. There are no predefined values – the values used must be agreed with the client app developer.
Leave region blank – it is reserved for future use.
Click
 at the top right of the pane to add the section to the rail.
Once you have added all the required sections to the rail, click Save Unsaved Changes.
Click Back to Rails to see your new rail.
ION-specific notes
ION expects the following fields to be populated with the appropriate values:
imageId
localizedPromotionalText
campaignCode
One or more platform-specific deepLinks or an externalLink
uiLayout – one of the following:
These contain a single banner item:
promotion_strip_smallpromotion_strip_largepromotion_strip_15x2promotion_strip_singlepromotion_strip_single_mediumpromotion_strip_single_big
These contain two banner items:
promotion_strip_double_9x2promotion_strip_doublepromotion_strip_double_big
Note that Number of items (above) must be set to the number of items that the specified uiLayout can contain.